How do I import passive microwave EASE-Grid brightness temperature data into ArcGIS?
This article describes how to import passive microwave EASE-Grid brightness temperature data into ArcGIS.
For importing EASE-Grid 2.0 data into ArcGIS, refer to How do I import EASE-Grid 2.0 snow cover and sea ice data into ArcGIS?
1. Rename data file
Data files from DMSP SSM/I-SSMIS Pathfinder Daily EASE-Grid Brightness Temperatures and Nimbus-7 SMMR Pathfinder Daily EASE-Grid Brightness Temperatures are compressed with the gzip utility. You will notice the file name has no extension. Extract the data file to your computer and rename it to include a .bsq (band-sequential) file extension.
2. Create a header file
Create an ASCII header file with the same name as your data file, but with an .hdr extension.
EASE-Grid data are available in high and low resolutions, indicated by the file names. In the header file names, N represents North, S represents South, M represents Global, L indicates 25 km resolution in SMMR and SSM/I data; and H indicates 12.5 km resolution, which is only used for the SSM/I 85 GHz channels.
Downloadable Header Files:
| Header File Name | Data Description |
|---|---|
NH.hdr | 12.5 km (high) resolution 16-bit SSM/I 85 GHz brightness temperature data |
SH.hdr | |
MH.hdr | |
NL.hdr | 25 km (low) resolution 16-bit data; all SMMR files, including time files; SSM/I brightness temperature files only |
SL.hdr | |
ML.hdr | |
NLtime.hdr | 25 km (low) resolution SSM/I (8-bit) time files only |
SLtime.hdr | |
MLtime.hdr |
3. Convert image to an ESRI compatible grid format
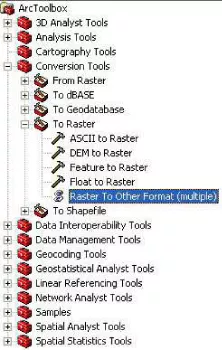
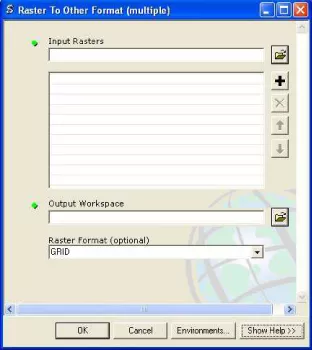
Start ArcMap and open ArcToolbox. Select Conversion Tools > To Raster > Raster to Other Format. The Raster to Other Format window will appear. In the Input Raster box, browse and select the EASE-Grid data file with the .bsq extension (Refer to Step 1). In the Output Workspace box, select the location to store the new data set. In the Output Format box, select the format to create the new data set; this can be one of three formats: ESRI Grid, ERDAS Imagine, or TIFF. Click OK.
4. Define the projection for the new data set
In ArcToolbox, under Data Management Tools select Projections and Transformations > Define Projection. In the window that appears, select the newly created grid (Refer to Step 3) as the input data set. Next, select the button next to the coordinate system box. In the window that appears select New... > Projected.
In the new window, enter a custom projection name in the first box. Then, select the projection for your data set (Lambert_Azimuthal_Equal_Area for Northern and Southern Hemisphere data and Cylindrical Equal-Area for global data). Next, modify the projection parameters to match the following:
| North | False_Easting: 0.0 |
|---|---|
| False_Northing: 0.0 | |
| Central_Meridian: 0.0 | |
| Latitude_Of_Origin: 90.0 | |
| South | False_Easting: 0.0 |
| False_Northing: 0.0 | |
| Central_Meridian: 0.0 | |
| Latitude_Of_Origin: -90.0 | |
| Global | False_Easting: 0.0 |
| False_Northing: 0.0 | |
| Central_Meridian: 0.0 | |
| Standard_Parallel_1: 30.0 |
Leave the Linear Units as meters and proceed to the Geographic Coordinate System box and select New.... In the new window, enter a new name, then assign the Datum to be <custom>. Leave the Spheroid option box as <custom> and in the Semimajor axis and Semiminor axis boxes, enter 6371228. Next, change Angular Units to Degrees and choose Greenwich for the Prime Meridian box. Before clicking OK in the final window, be sure to review and Save the newly created coordinate system so that other data sets can easily be reprojected to the new system. Click OK.
Command Line Routines
The commands discussed here for converting and projecting EASE-Grid data can also be run at the command line in ArcGIS 9.x. To open the command line in ArcMap, select the command line icon.
After renaming the data to a .bsq file and creating a header file (Refer to steps 1 and 2) use the following command to convert the data into a compatible grid format:
RasterToOtherFormat <in_dataset; in_dataset; ...> <output_workspace> {GRID; IMAGINE IMAGE; TIFF}
Where <in_dataset> is the name of the EASE-Grid file to convert, <output_workspace> is the location to store the new data set, and {GRID; IMAGINE IMAGE; TIFF} is the format for the new raster data set.
The next step is to project the newly created raster data set. This can be accomplished with the following command:
DefineProjection_management <in_dataset> <coor_system>
Where <in_dataset> is the newly created data set and <coor_stystem> is the full path to the location of the appropriate .prj file created in Step 4.

